Software & Tools for Culture as Data
In this course, we will be utilizing a number of different software platforms and tools. Some of the tools are optional, but are highly recommended. Setting up some of these tools will be easy, but others will expose you to some of the more frustrating aspects of working with computers. The best representation of what I’m talking about is this xkcd comic, entitled Dependency.
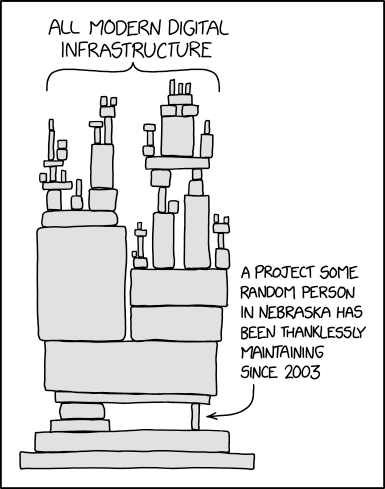
Dependency by Randall Munroe
Essentially, modern software is a bit of a house of cards, and it’s not uncommon to spend hours trying to get something to work, only to find out that you were missing a single character in a configuration file or have some conflicting dependency. The key thing to know is that this is not a reflection of your ability to work with computers, but rather a reflection of the state of modern software. In fact, this kind of configuration work is common enough that there are essays about the value and frustration of command-line “bullshittery”. There’s also this great free MIT resource called The Missing Semester of Your CS Education https://missing.csail.mit.edu/2020/course-shell/ and https://missing.csail.mit.edu/2020/command-line/ that covers some of what we will be doing here if you would like more background information.
The remainder of this page contains installation instructions for the tools/software/programming languages we will be using in this course, listed in order of complexity of installation. Most of the links are operating system agnostic, but if indicated, please follow the instructions for your computer type (Windows = any computer running windows, Mac = any apple computer). Most of the instructions involve clicking on links to download programs, though a few also require you to paste text into your computer.
You should do your best to get through the majority of the installation instructions before our next class, but if you get stuck, please reach out to the instructor via Slack (especially if you’ve been trying for more than ~20 minutes) and also know that we will have time in our Thursday class session to help troubleshoot any installation issues. Again, any issue you face is a feature of the difficulty of working with computers, not a reflection or indication of your ability to code.
Assigned List of Software & Tools
Required
Optional
Slack
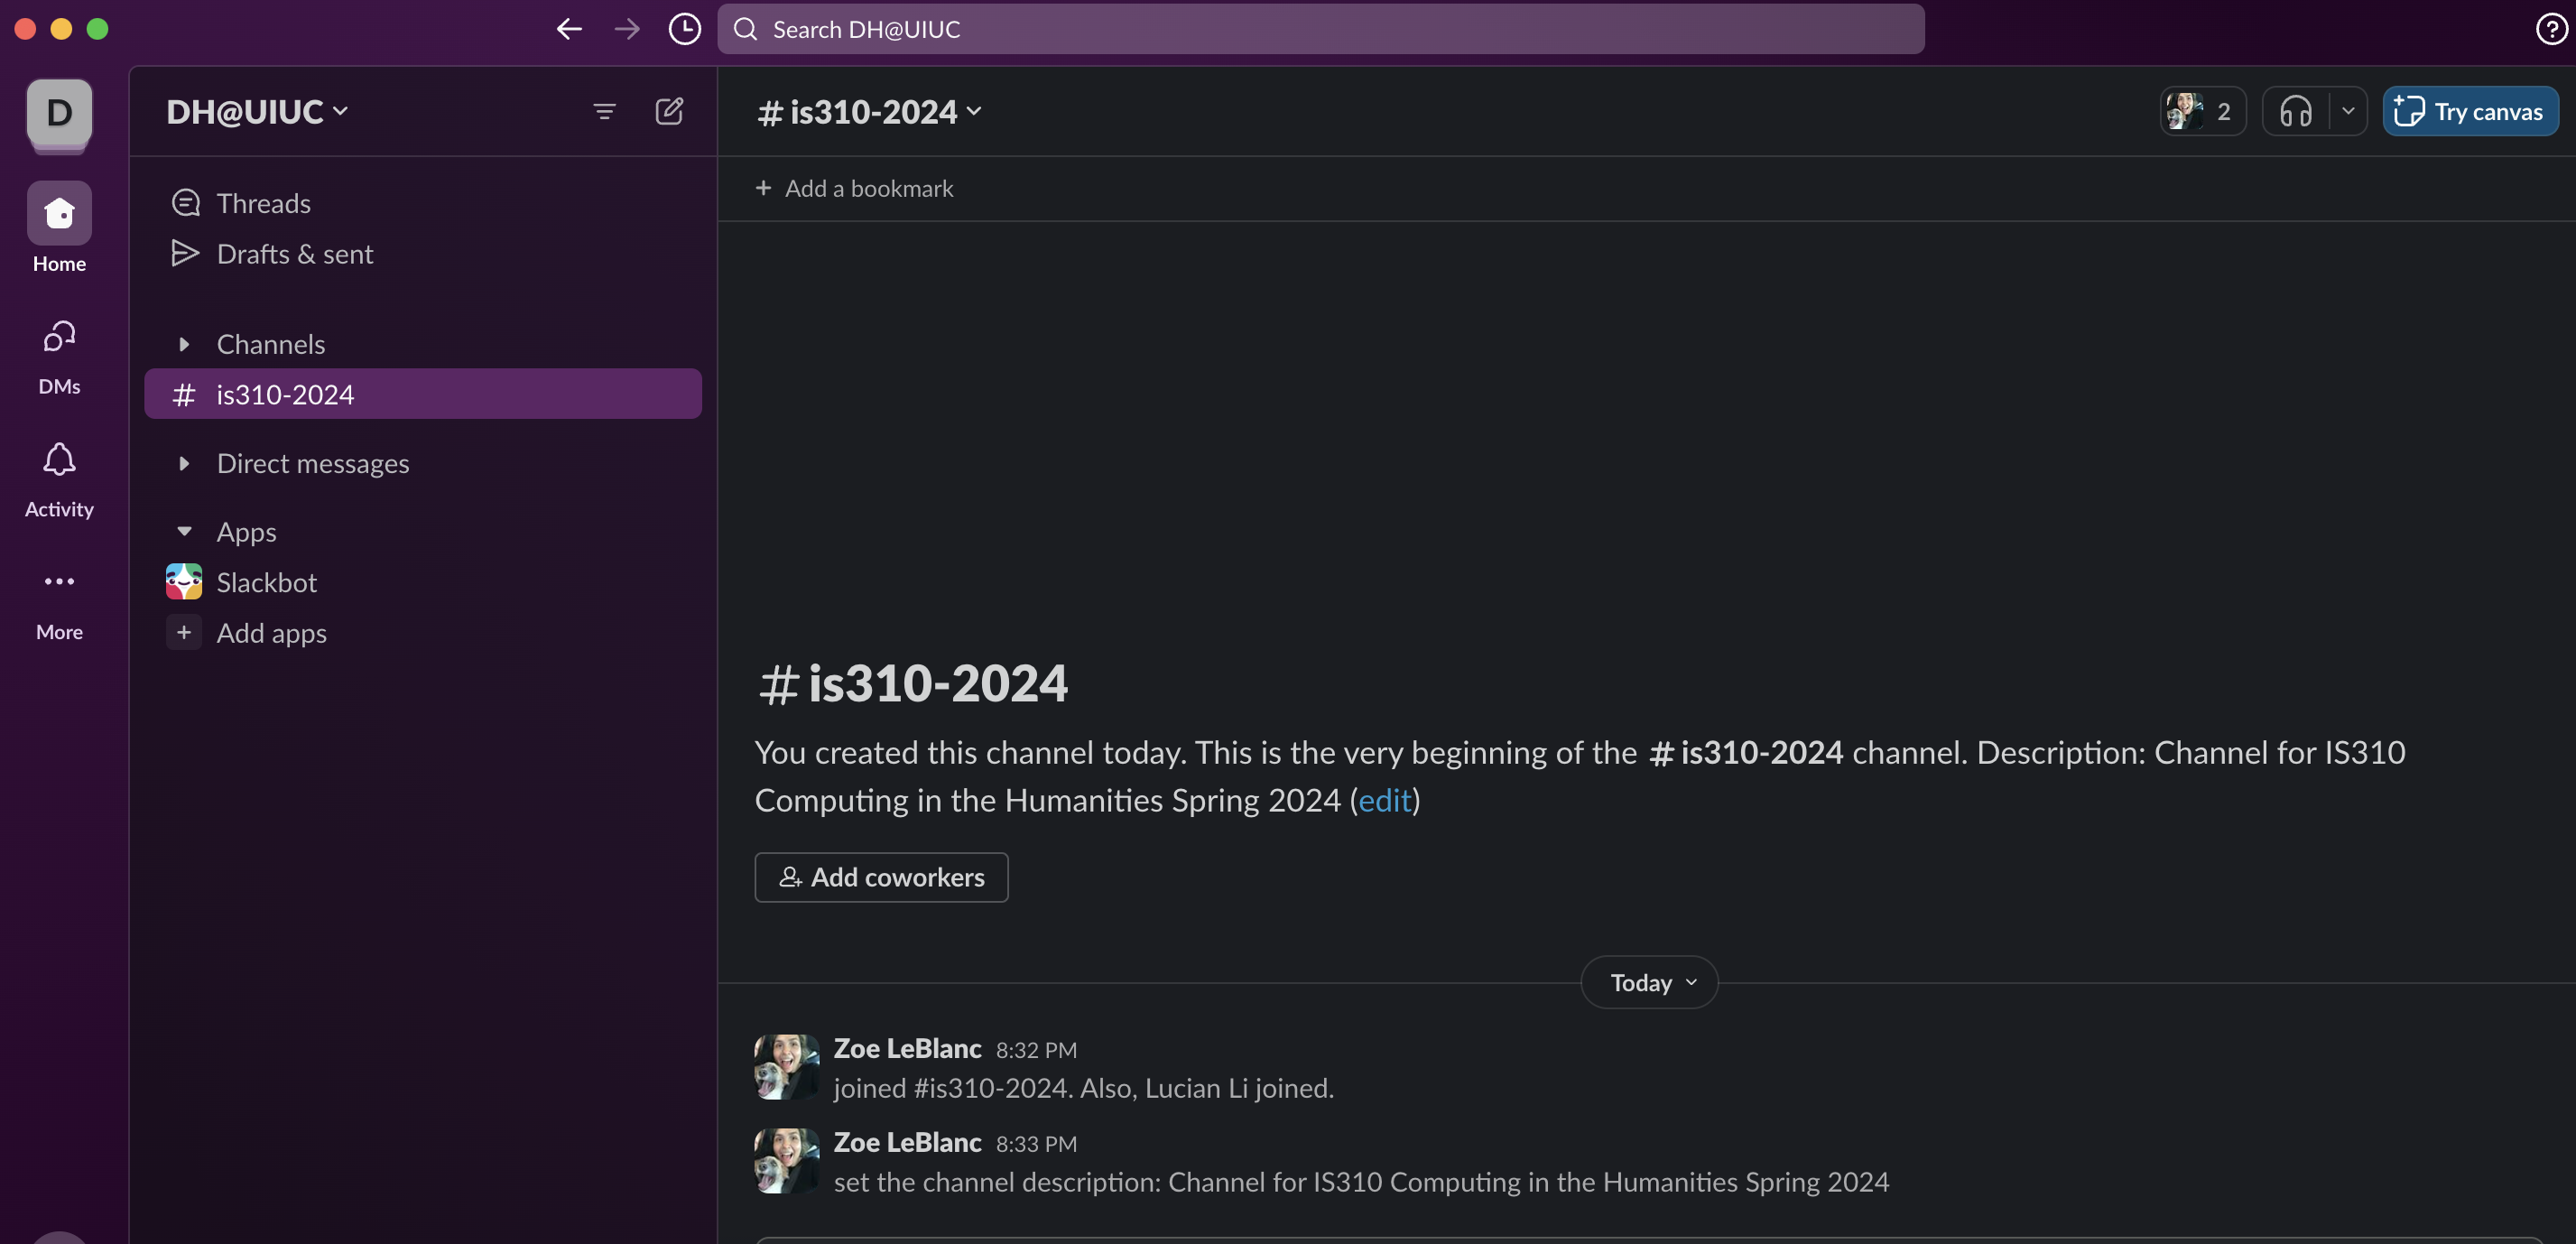
Slack is a communication tool that we will use for this course. You can download the app for your computer or use the web version. You can also download the app for your phone. You will need to create an account and join the course channel is310-fall-2026 on the DH@UIUC team. The link to join Slack is available on Canvas, and you can add yourself to our channel or ask the instructors for assistance.
I realize that Slack is less popular than a platform like Discord, but it is a very popular platform for Digital Humanities. In fact, the primary DH Slack Team is a great place to ask questions and get help from other DHers. You can read more about it and how this field uses Slack in this writeup by Amanda Visconti https://literaturegeek.com/2016/07/06/digital-humanities-slack-community-design.
You are welcome to make any username you want, but please be sure to share who you are in the course channel so we can all get to know each other.
Hypothesis
For our collective annotations, we will be using the Hypothesis platform. You can sign up for Hypothesis here hypothes.is/signup and join our collective group via Canvas. You will need to install the Hypothesis Browser Extension for your preferred browser as well. You should follow the instructions available in this Quick Start Guide https://web.hypothes.is/help/quick-start-guide/.
You are welcome to make your username whatever you choose. And please be sure to make your annotations in our hypothes.is group is310-fall-2026. You can find the link to join the group at the top of our Canvas home page.
How to Annotate with Hypothesis
In short, once you’ve created your account and joined our group, you can start making annotations. To do that, you’ll need to install the Hypothesis browser extension for your browser of choice.
For Chrome or other Chromium browsers, such as Edge or Brave, you can install the Hypothesis extension from the Chrome Web Store.

For Firefox or Safari, you can install the Hypothesis bookmarklet by visiting the start page and following the instructions in step 2.
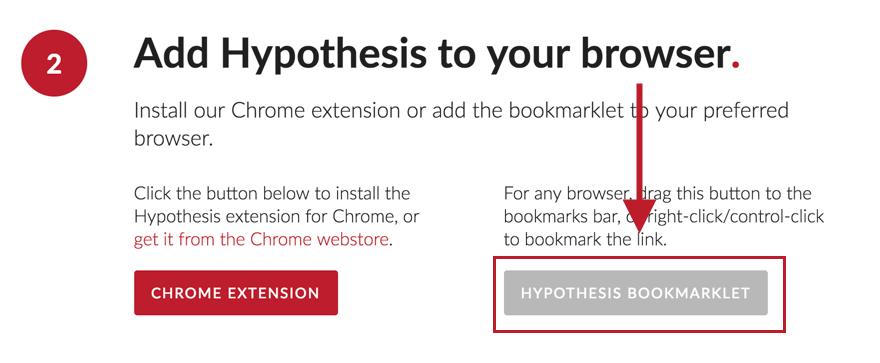
Once you’ve done that, you can start annotating by selecting text on a webpage and clicking the “Annotate” button that appears. You can find detailed instructions in this guide https://web.hypothes.is/help/annotation-basics/. But I will share a few key points here.
Viewing & Making Annotations with Hypothesis
To view annotations and activate your Hypothesis extension, you should click the Hypothesis extension icon if working in Chrome or similar browsers, which looks like the following:

Or if you are in Firefox or Safari, you should activate the bookmarklet by clicking the bookmarklet in your bookmarks bar.

Once activated, you can view existing annotations by clicking the sidebar icon that appears on the right side of your browser window.

You’ll want to make sure that you are logged into your account, which you can do in the sidebar:

Finally, you can start annotating by selecting text on a webpage and clicking the “Annotate” button that appears.

There’s lots of additional features that you can read about in the guide, but the key thing is to make sure you are logged in and that you are making your annotations in the is310-fall-2026 group.
You can switch your annotations from being public to being part of the group by selecting the group from the dropdown menu in the annotation window.
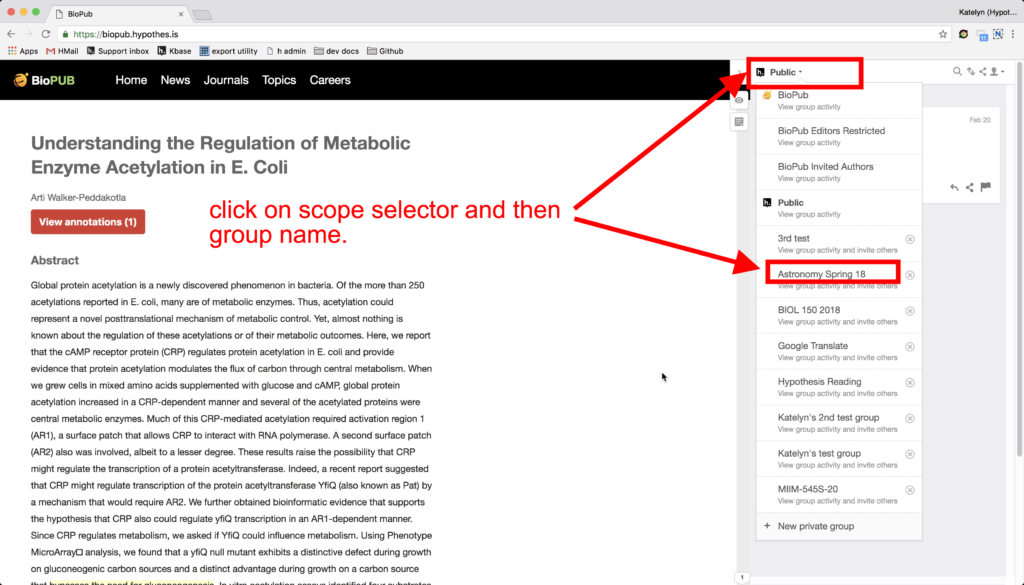
You can read more about using Hypothesis groups in this guide https://web.hypothes.is/help/annotating-with-groups/. Feel free to reach out to the instructor if you have any questions or need help with Hypothesis.
Using Hypothesis on Local PDFs
While most of the materials for this course are public on the web, we will occasionally have PDFs that are not. You can still annotate these PDFs using Hypothesis by following the instructions in this guide https://web.hypothes.is/help/annotating-locally-saved-pdfs/. The main steps are as follows:
- Save the PDF to your computer. These will be available on Canvas or through the UIUC library.
- If you are using Chrome, you will need to adjust your Hypothesis extension settings to allow for local PDFs. You can do this by clicking on the Hypothesis extension icon, selecting the gear icon, and then toggling the setting to allow for local PDFs.
- First, right-click on the Hypothesis extension icon in Chrome and select “Options” from the context menu.
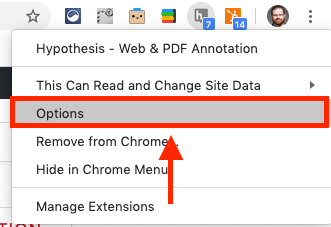
- Then, dismiss the pop-up window that appears.
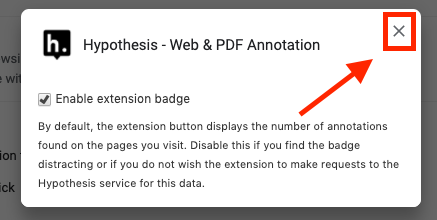
- Finally, make sure site access is set to “On all sites” and switch the control on for “Allow access to file URLs.”

- Open the PDF in your browser and click the Hypothesis extension icon to start annotating. Specifically, in the menu bar at the top of your screen, click File and select
Open File. Alternatively, you can useCommand + Oon Macs orCtrl + Oon PCs. Then make sure you have the Hypothesis extension enabled, that you are logged in, and that you are posting tois310-fall-2026.
Please let the instructor know if you have any issues with this process.
GitHub

If you do not already have a GitHub account, you will need to sign up for an account for this course. For those unfamiliar, GitHub https://github.com/ is a web-based platform that allows you to host and version code-related projects, while also working collaboratively. The best analogy is to imagine a blend of a data management and collaborative work platform like Google Drive with a social media platform like Twitter. It uses Git, a version control system, which is somewhat confusingly different from GitHub, to manage the history of a project.
GitHub is free to use (part of its popularity) and once you have an account you can store code and related materials (like datasets, for example) remotely, while also working collaboratively on these materials. The platform primarily consists of users, organizations (which users can join), and repositories (often called “repos” that are akin to folders or directories) for storing materials. In many ways, GitHub is similar to Google Drive, allowing users to both upload, organize, and keep versioned histories of their files. However, unlike Google Drive or other research management platforms, GitHub is also a platform for social coding, where users can publicly work on projects together, follow one another, comment on each other’s work, and view each other’s activity (somewhat like Twitter, Mastodon, Bluesky, etc…).
We will be delving into GitHub’s functionality in the next few weeks, but first you will need to sign up for an account. You can sign up for an account here https://github.com/signup. GitHub provides additional documentation on signing up for an account. In terms of selecting a username, I would recommend choosing something that you plan to use professionally.
You do not need GitHub Education Benefits to complete this course. A regular free GitHub account is enough for our required work.
If you want to use GitHub Copilot as your optional AI coding tool, you can apply for GitHub Education Benefits at https://github.com/education/students. You can find step-by-step instructions here https://docs.github.com/en/education/explore-the-benefits-of-teaching-and-learning-with-github-education/github-global-campus-for-students/apply-to-github-global-campus-as-a-student. You will need to use your @illinois.edu email and show proof of your student status, such as an ID or academic record. Approval can take a few days.
If you have issues applying and want to use Copilot specifically, please contact the instructor for assistance.
Both GitHub and Copilot are owned by Microsoft, which acquired the platform in 2018 for 7.5 Billion dollars1, and the platform has become the de facto platform for hosting code, with the platform announcing that it had over 100 million users in 2023.2
Considerations and Criticisms of GitHub

These numbers sound impressive, but should also be concerning. The consolidation of code and data on a single platform raises questions about the centralization of knowledge and the power of a single company to control the future of software development, if not all technology writ large.
While alternatives to GitHub exist (primarily GitLab or Bitbucket), it is hard to overstate how much in the last decade GitHub has become the platform for this type of work. Such a centralization is truly a double-edged sword. For example, GitHub has created what amounts to the largest code archive in the world through their GitHub Arctic Code Vault, an initiative to take a snapshot of all code hosted on their platform on February 2, 2020 and store it in the Svalbard Global Seed Vault. Such an initiative is impressive and was done in partnership with some academic institutions (the exact partners were the Long Now Foundation, the Internet Archive, the Software Heritage Foundation, Arctic World Archive, Microsoft Research, the Bodleian Library, and Stanford Libraries). But it also raises a number of ethical, archival, and political questions.

For example, this Arctic Code Vault has been criticized for its erasure of the indigenous Sami people who live on Svalbard and its performative approach to archives.3 GitHub also has contracts with U.S. Immigrations and Customs Enforcement (ICE) led to protests and boycotts from some sectors of the developer community.4 While we plan to use this platform, it’s important to do so with these issues in mind. For more on these criticisms, see:
- Fussell, Sidney. “The Schism at the Heart of the Open-Source Movement.” The Atlantic, January 3, 2020. https://www.theatlantic.com/technology/archive/2020/01/ice-contract-github-sparks-developer-protests/604339/.
- Mackenzie, Adrian. “48 Million Configurations and Counting: Platform Numbers and Their Capitalization.” Journal of Cultural Economy 11, no. 1 (January 2, 2018): 36–53. https://doi.org/10.1080/17530350.2017.1393443.
Why Use GitHub for Digital Humanities/Computing in the Humanities?
While primarily marketed towards software developers, GitHub is also incredibly popular for digital humanities. It is widely used for hosting data sets, text corpora, and other scholarly research assets. It provides a central place to publish, discover, and collaborate on such resources.
For instance, academic journals like the Programming Historian use GitHub for the entire publishing life cycle (you can explore for yourself https://github.com/programminghistorian/jekyll). You can get a sense of how popular GitHub is for digital humanities through searching for digital-humanities on the platform https://github.com/search?q=digital%20humanities&type=repositories or taking a look at the number of repositories on GitHub tagged as digital-humanities https://github.com/topics/digital-humanities.
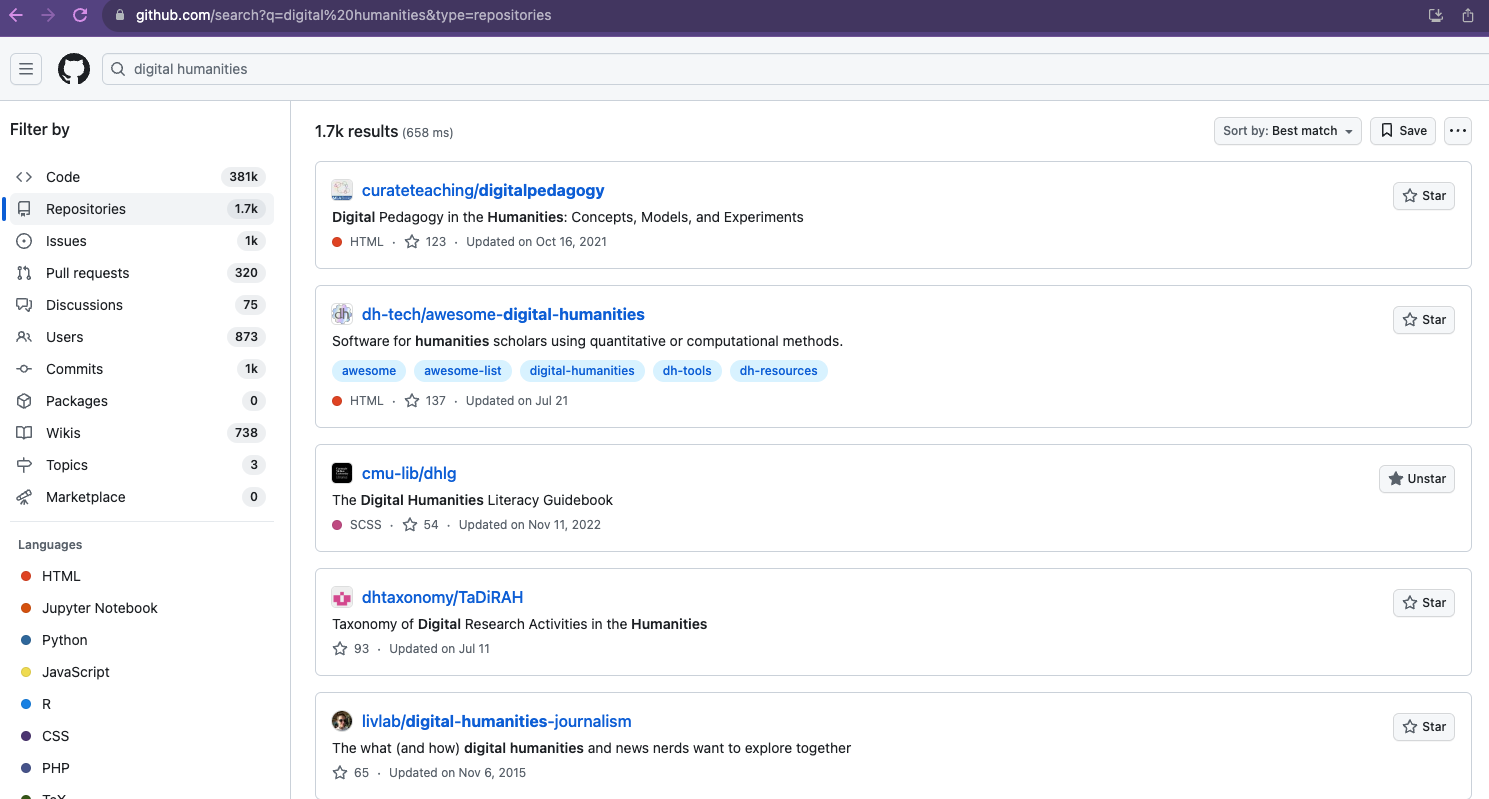
Though this platform is very popular and useful for this course, we will do our best to use it critically and thoughtfully (a mindset we will hopefully bring to our various infrastructures and tools!).
Optional AI Coding Tools
As part of our course, we will discuss how to use AI tools critically and practically while coding. AI use is optional. GitHub Copilot is one possible tool, and it uses machine learning to suggest code as you write. It is a bit like the auto-complete feature in Google Docs, but instead of just suggesting words, it suggests entire lines of code. You can read more about it here https://github.com/features/copilot.
You are welcome to use GitHub Copilot, ChatGPT, Claude, Gemini, a local/open-source model, or no AI tool at all in this course. I suggest Copilot because students can get access for free through GitHub Education Benefits, but I am completely agnostic about which tool you choose.
However, as a reminder, whatever tool you choose, you are responsible for understanding, testing, and documenting the code you submit. AI tools can help you learn and troubleshoot, but should not replace your own explanation of what your code does, why it works, or what risks it introduces.
You are also welcome to use no AI tool at all, and I will not penalize you for doing so. The goal of this course is to learn how to code, and you can do that with or without AI tools. Just again, please note your choice in your documentation and be sure to understand the code you submit.
VS Code
We will be using Visual Studio Code (VS Code) as our primary code editor for this course. You can download VS Code here https://code.visualstudio.com/. You should be able to use the link above to download VS Code for Windows, Mac, and Linux.
Like GitHub and Copilot, VS Code is also owned by Microsoft, which is why all three work relatively well together. VS Code is something called an Integrated Development Environment (IDE), which is a fancy way of saying it is a program for writing code. You can read more about IDEs here https://en.wikipedia.org/wiki/Integrated_development_environment. Other popular IDEs include Sublime Text and PyCharm. While you are welcome to use any IDE you want, I will be using VS Code in this course and would highly encourage you to at least test it out.
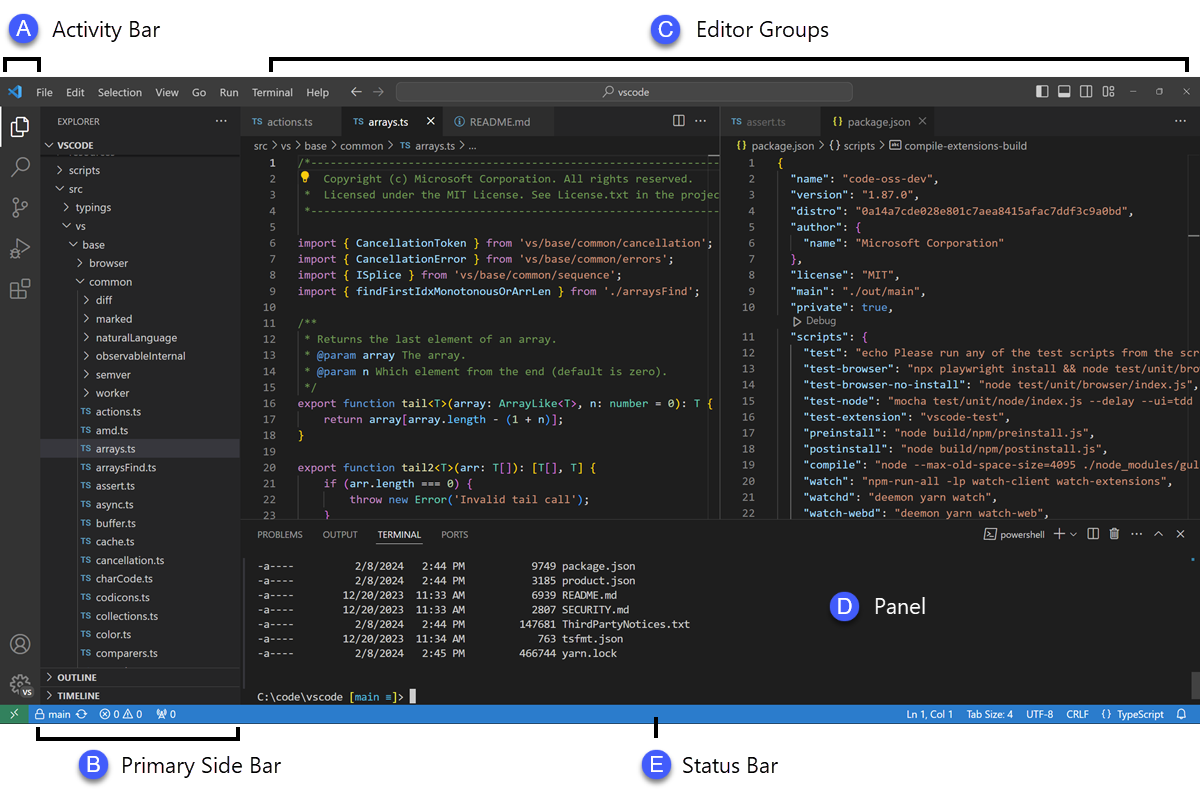
An example of Visual Studio Code
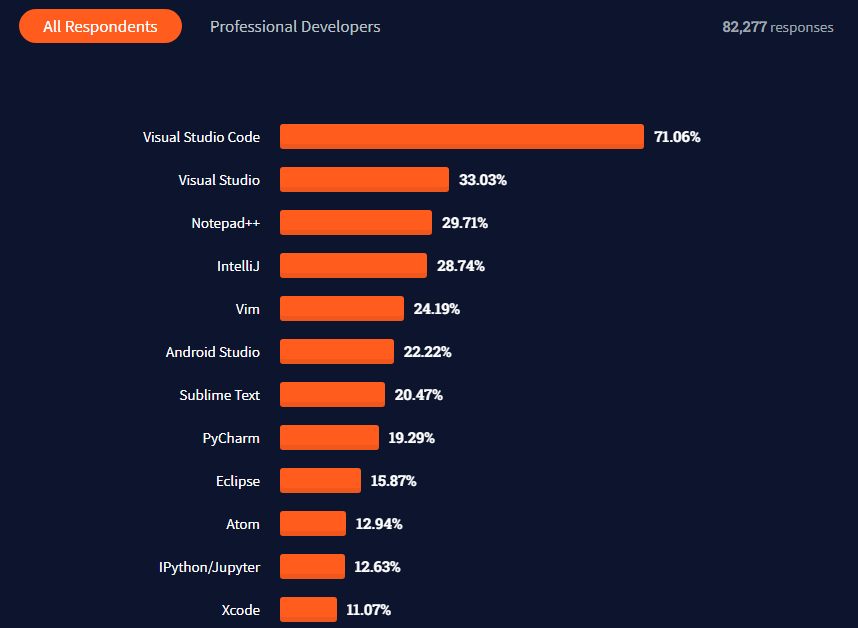
Comparison of Most Popular IDEs from the annual Stack Overflow Survey
Another benefit of getting used to VS Code is that you can use it in the browser for any GitHub repository by changing .com to .dev. So for example if you took the link to our course repository, https://github.com/CultureAsData-UIUC/is310-fall-2026, and switched it to https://github.dev/CultureAsData-UIUC/is310-fall-2026, you would see the VS Code version of our repository in the browser.
Installation for Mac Users
For Macs, you will need to check if you have an Intel Chip or an Apple Silicon. You can check this by going to the Apple menu > About This Mac.

You can see in this example the Chip says Apple M2 Pro, which means this is an Apple Silicon. If you see Intel then you have an Intel Chip. Download the appropriate version for your computer through selecting the zip option and then opening and installing the program.
Installation for Windows Users
For Windows, you will need to check if you have a 64-bit or Arm64 operating system. You can check this by going to Settings > System > About and looking at the System type field.
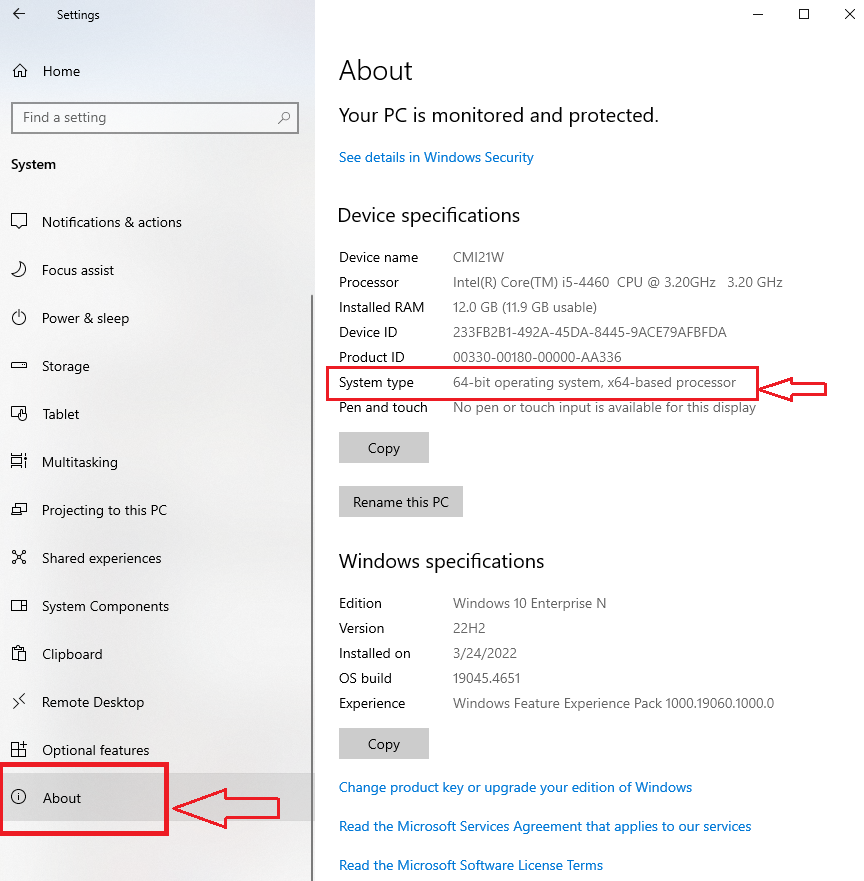
Once identified, you should select the User Installer option and then open and install the program.
VS Code Extensions
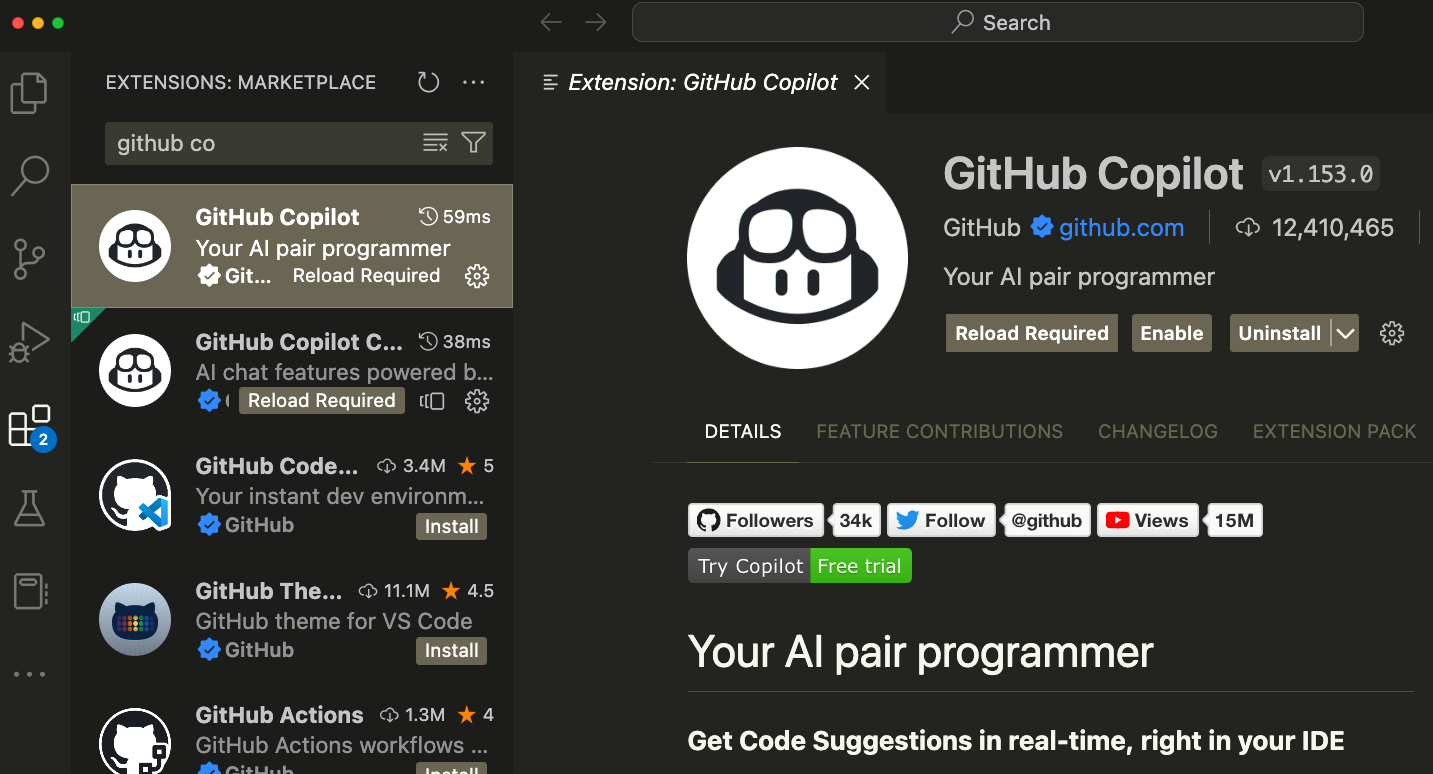
Once you have VS Code installed, you will need to install a few extensions. Extensions are a bit like apps for VS Code, and you can read more about them here https://code.visualstudio.com/docs/editor/extension-gallery. You can install extensions by clicking on the Extensions icon in the left sidebar of VS Code and then searching for your relevant extension. We will be installing various extensions over the course of the semester, but the first one you should install is the GitHub Copilot extension. You can find it by searching for GitHub Copilot in the Extensions Marketplace.
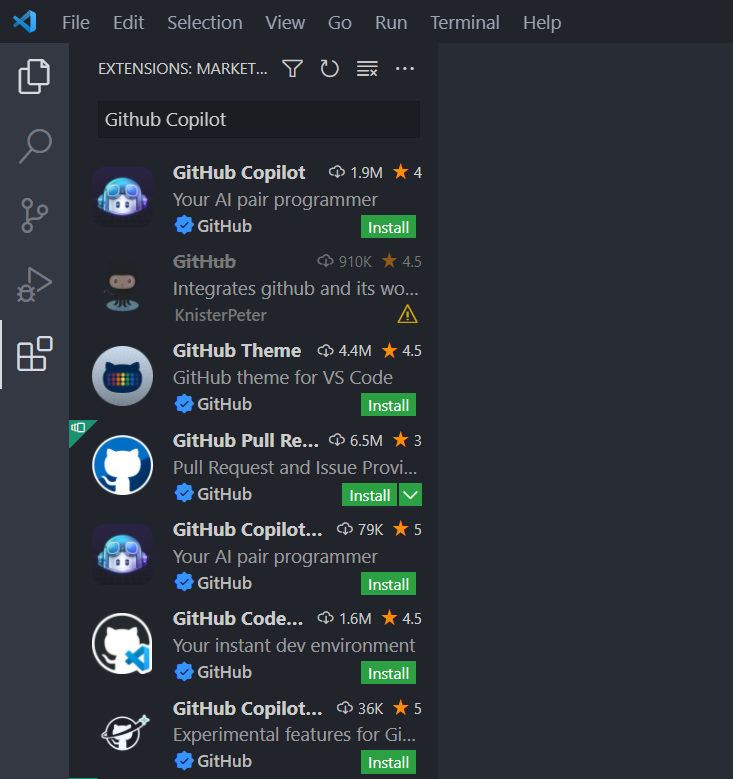
Once you click install, you will need to reload VS Code and then you should be able to use Copilot. We will be learning how to use Copilot with VS Code in the next few weeks, but you can read more about it here https://code.visualstudio.com/docs/editor/github-copilot.
Disabling GitHub Copilot
While this class allows you to use AI tools, some of your other coding classes will not. So, if you need to disable Copilot, all you need to do is click the Extensions icon in the left sidebar of VS Code, search for GitHub Copilot, and then click Disable.
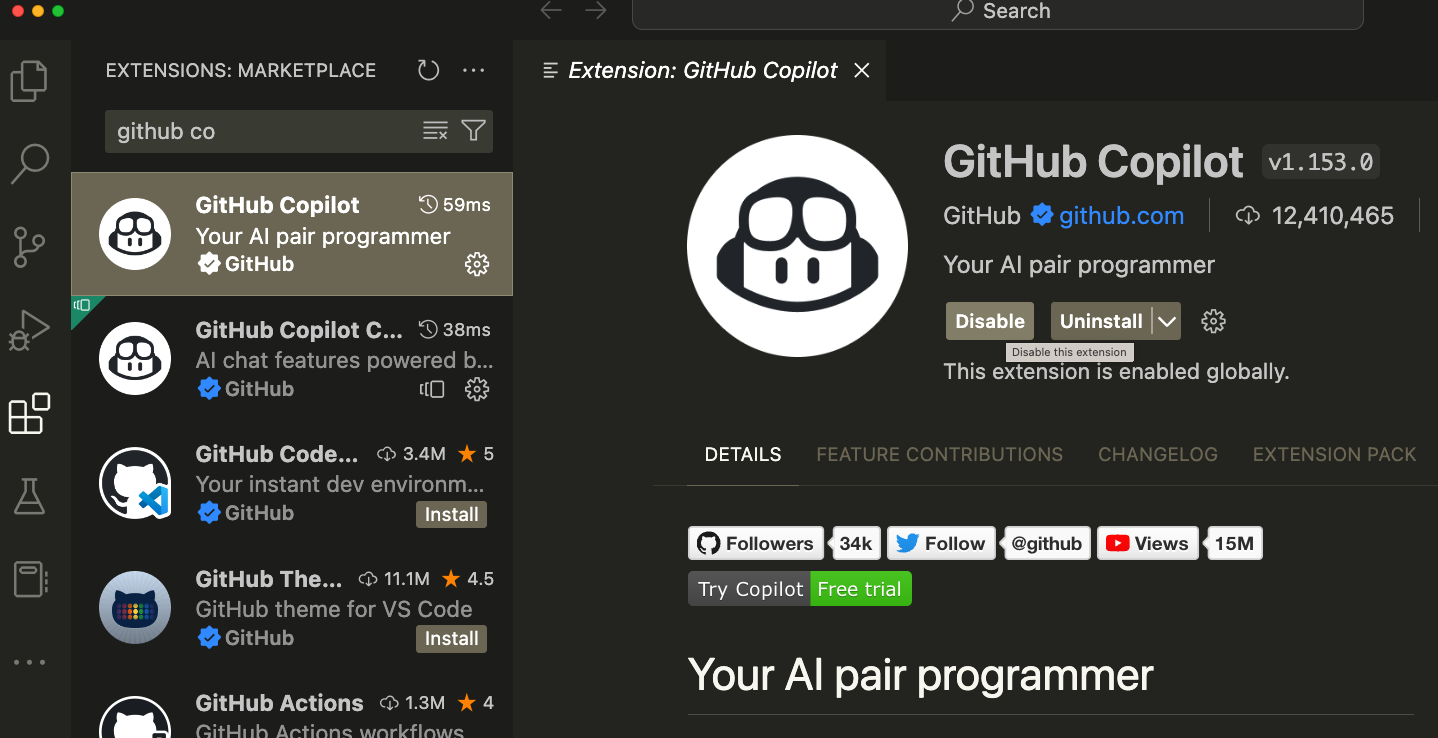
Once it is disabled, you will need to reload VS Code. And then you can re-enable it by clicking Enable in the same location.
Python
What is Python?

You can read more about Python here https://en.wikipedia.org/wiki/Python_(programming_language) and here https://www.python.org/about/ (also in case you did not know, yes Python is named after the comedic Monty Python series). This course presumes you already have about a semester of experience with Python, if not more, but if you are new to Python, please let the instructor know and also would highly recommend taking a look at the resources on The Programming Historian https://programminghistorian.org/en/lessons/ and looking at Melanie Walsh, Introduction to Cultural Analytics & Python, https://melaniewalsh.github.io/Intro-Cultural-Analytics/02-Python/00-Python.html.
Why Python?
|
|
|

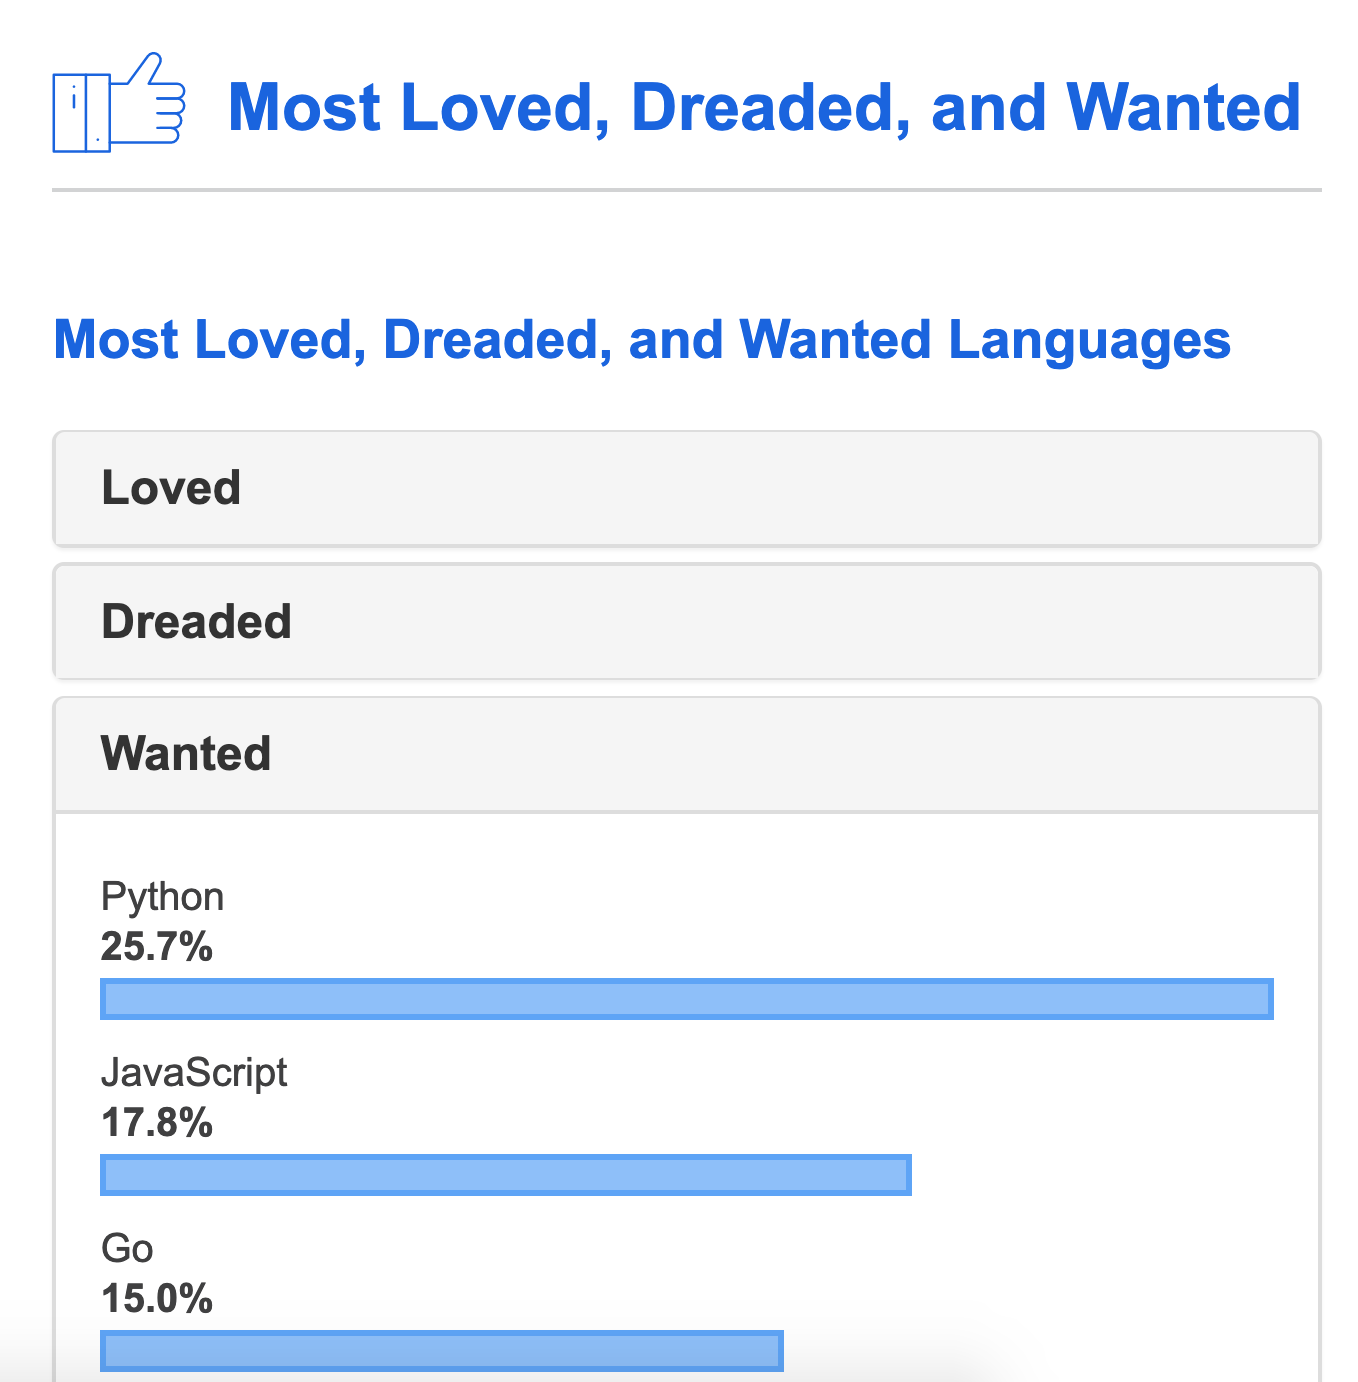
In this course, you’ll be writing code in a few different programming languages, but we’ll primarily be using Python. The choice of Python is for a few different reasons. First, Python is well suited to both web development and data analysis – two of the core activities of this course. Second, Python is increasingly becoming a standard in a number of industries and academic disciplines, though other languages like R are also popular. Third is that many of the programming concepts you will learn in Python can transfer relatively well to other programming languages. And finally, Python is a popular language for Digital Humanities research and is used by a number of different DH projects and platforms.
Installing Python
Installing Python and getting it correctly configured is increasingly a very challenging and time consuming task, but I believe it is worthwhile since you will ideally keep coding after this course ends. But I want to forewarn you that this process can be frustrating and time consuming, so please reach out to the instructor if you get stuck or if you are feeling unsure or nervous about this task. To give you a sense of what I mean, here is a comic from xkcd about the Python Environment.
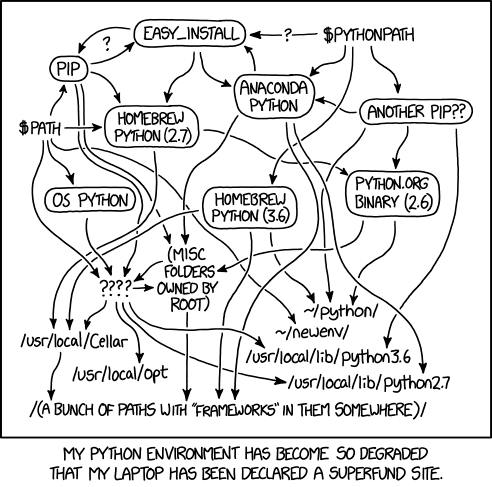
Python Environment by Randall Munroe
Mac Installation
You may have previously used Anaconda for installing Python on your Mac. Anaconda has a number of benefits, but also a number of drawbacks once you start getting deeper into programming. For this course, we will be trying our best to install Python without Anaconda, but if you are having trouble, please let the instructor know and we can try and find a solution.
We’ll largely be following the instructions from https://realpython.com/installing-python/#how-to-install-python-on-macos.
The first step is to check if you have Python installed on your computer. You can do this by opening up VS Code and then opening up the terminal. You can do this by clicking on either the Terminal menu option and then selecting New Terminal, or selecting View and then selecting the Terminal option. You should see a terminal window open up at the bottom of your VS Code window, and can find more detailed information on this here https://code.visualstudio.com/docs/terminal/basics.
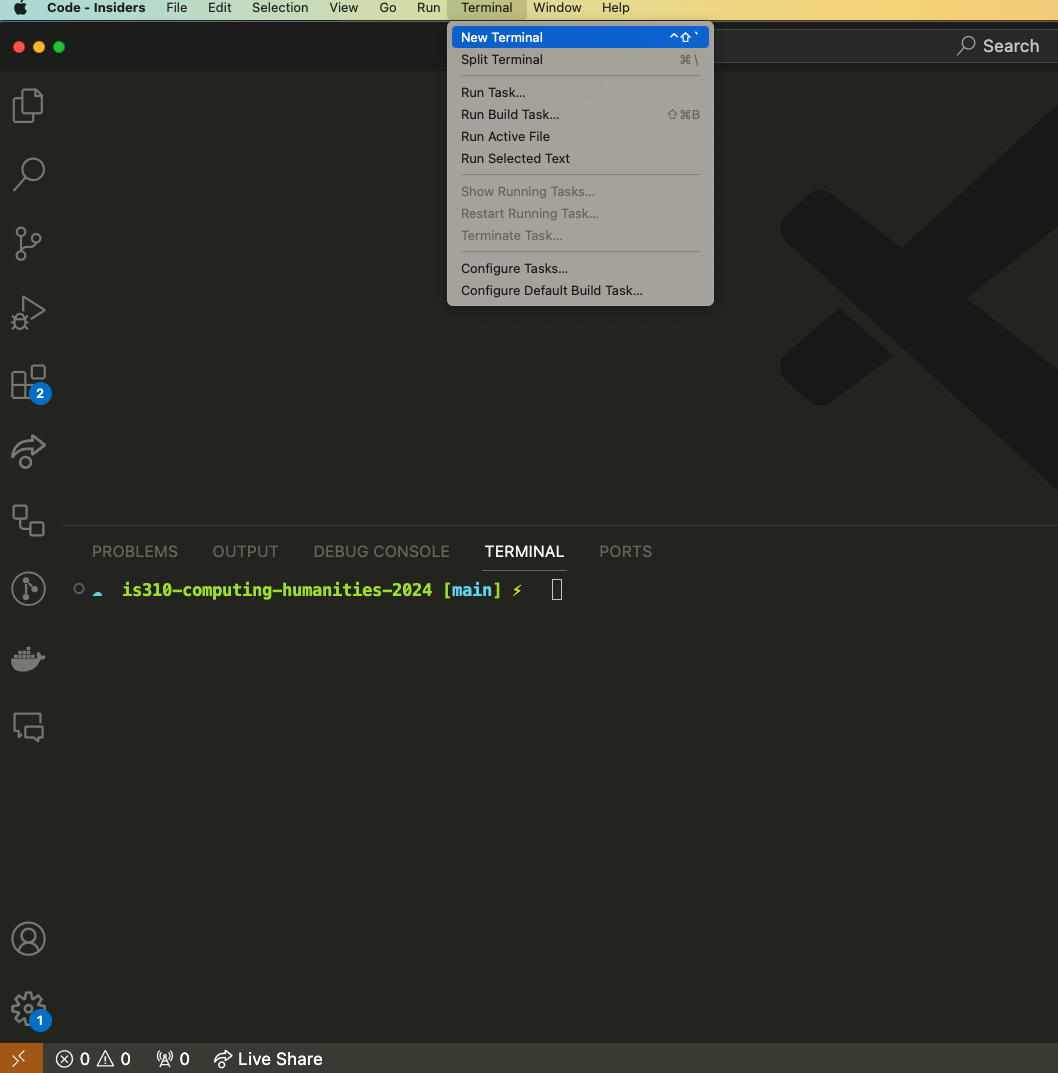
Once you have your terminal open, you can check if you have Python installed by typing the following command:
python --versionThis may show you an older Python installation, a Python 3 installation, or an error saying that python is not available. If you see Python 2, that version is now officially retired and you will end up with a lot of errors if we do not upgrade (also you can check the old countdown clock for the migration from Python 2 to 3 https://pythonclock.org/).
You should also double check that you have not already installed Python 3. You can do this by typing the following command:
python3 --versionIf you have Python 3 installed, you should see something like this:
Python 3.x.xWhile your version number might be different, you should see Python 3 in the output. If you do not see Python 3 in the output, then you will need to install Python 3.
There’s currently two ways to install Python on a Mac, using either the official installer or the Homebrew package manager. There’s pros and cons to each, and so if you think you might be using Python quite a bit going forward I would recommend the Homebrew approach, but if you are not sure, then I would recommend the official installer.
Homebrew Installation
Open a browser and navigate to http://brew.sh/. You should see a command for installing Homebrew near the top of the page under the tile “Install Homebrew.” It should look something like this:
/bin/bash -c "$(curl -fsSL https://raw.githubusercontent.com/Homebrew/install/HEAD/install.sh)"Copy this command and paste it into the VS Code Terminal, and then press enter. You will be prompted to enter your computer password (i.e. the one you use to login into your Macbook). You will need to enter this password but you will not be able to see it as your typing. Once you have typed it, hit enter and then Homebrew will install.
You should also upgrade Homebrew by typing the following command into the terminal:
brew update && brew upgradeThis will take quite some time, so do not be concerned if it is taking an hour or more (more than that though there’s probably an issue and you should contact the instructor).
Once that’s complete, you may also need to install Xcode Command Line Tools, by typing into the terminal:
xcode-select --installIf you already have Xcode installed, you’ll see a message like this:
xcode-select: error: command line tools are already installed, use "Software Update" to install updatesOtherwise, you’ll see a message about installing the tools, and you’ll need to click Install to continue.
To ensure that Homebrew works with your computer, you may need to add Homebrew to your path. The Homebrew installer should print the exact commands for your computer at the end of installation. On Apple Silicon Macs, the command usually looks like this:
echo 'eval "$(/opt/homebrew/bin/brew shellenv)"' >> ~/.zprofileAnd then:
eval "$(/opt/homebrew/bin/brew shellenv)"On Intel Macs, the path may be different, so follow the specific instructions printed by Homebrew. We will discuss what this is doing a bit more below, but for now, just know that it is making it so your computer can find software installed through Homebrew.
Then you will need to install Python 3 by typing the following command into your terminal:
brew install python3You can check that you have Python 3 installed by typing the following command:
python3 --versionYou should see something like this:
Python 3.x.xWhile your version number might be different, you should see Python 3 in the output.
Official Installer
You can download the official installer here https://www.python.org/downloads/macos/. You should download the latest stable version of Python 3 and use the macOS 64-bit universal installer. Once downloaded, you should open the installer and follow the instructions. You can find more detailed instructions here https://realpython.com/installing-python/#how-to-install-from-the-official-installer.
Once installed, you can check that you have Python 3 installed by typing the following command in the VS Code terminal:
python3 --versionYou should see something like this:
Python 3.x.xWhile your version number might be different, you should see Python 3 in the output.
Windows Installation (Somewhat Optional)
If you have a previous version of Python installed on your Windows machine, you are welcome to use that rather than following the instructions below. I would highly recommend the setup described below if you have long term plans to use Python, but if you are not sure, then you can use your previous version of Python. However, even though this installation choice is optional, you must be able to run Python. So please reach out to the instructor if you are having trouble.
We’ll be following Microsoft’s current instructions for installing WSL, using VS Code with WSL, and getting started with Python on Windows.
Installing WSL
The first step is to install the Windows Subsystem for Linux (WSL), which lets you run a Linux terminal on your Windows computer. For this course, this usually means installing Ubuntu through WSL and then using the Ubuntu terminal inside VS Code.
These instructions assume you are using Windows 10 version 2004 or higher (Build 19041 or higher) or Windows 11. If you are using an older version of Windows, Microsoft’s manual WSL installation instructions may be necessary.
In either PowerShell or Command Prompt, run the following command as an administrator:
wsl --installThis command should enable the required Windows features, install WSL, and install Ubuntu by default. You may then be prompted to restart your computer.
If you already have WSL installed, this command may show the WSL help text instead of installing Ubuntu. If that happens, you can list available Linux distributions with:
wsl --list --onlineThen install Ubuntu directly with:
wsl --install -d UbuntuNew Linux distributions installed with wsl --install should use WSL 2 by default. To check what version you are running, open PowerShell and type:
wsl --list --verboseIf your Ubuntu distribution is listed as version 1, set WSL 2 as the default for future installs:
wsl --set-default-version 2Or convert Ubuntu itself to WSL 2:
wsl --set-version Ubuntu 2The first time you launch Ubuntu, a console window will open and ask you to create a Linux username and password. This username and password are for your WSL/Ubuntu environment; they do not need to match your Windows account, Illinois account, or GitHub account.

Once Ubuntu is set up, update its packages. Open your Ubuntu/WSL terminal, not PowerShell, and run:
sudo apt update
sudo apt upgrade
These are Linux commands, so they work in Ubuntu/WSL. They will not work in regular PowerShell.
Customizing Windows Terminal and VS Code
Now that you have WSL installed, you can customize your Windows Terminal. I recommend using Microsoft’s WSL setup and best practices guide to customize your terminal and understand the basics of working between Windows and WSL.
You should also familiarize yourself with working with files in WSL. As a general rule, if you are using WSL for this course, keep your coding projects inside your Ubuntu home folder rather than scattering them across Windows folders.
Now you can get VS Code working with WSL by following Microsoft’s instructions for using VS Code with WSL. Install VS Code on Windows, install the WSL extension, and make sure VS Code has been added to your PATH.
Microsoft recommends using the WSL extension because it lets VS Code run your code, Git, terminal, and extensions inside your Linux environment while still giving you the familiar VS Code interface on Windows.
To open VS Code from WSL, open your Ubuntu terminal, navigate to your project folder, and type:
code .That should open VS Code connected to WSL. You should see a WSL indicator in the bottom-left corner of VS Code.
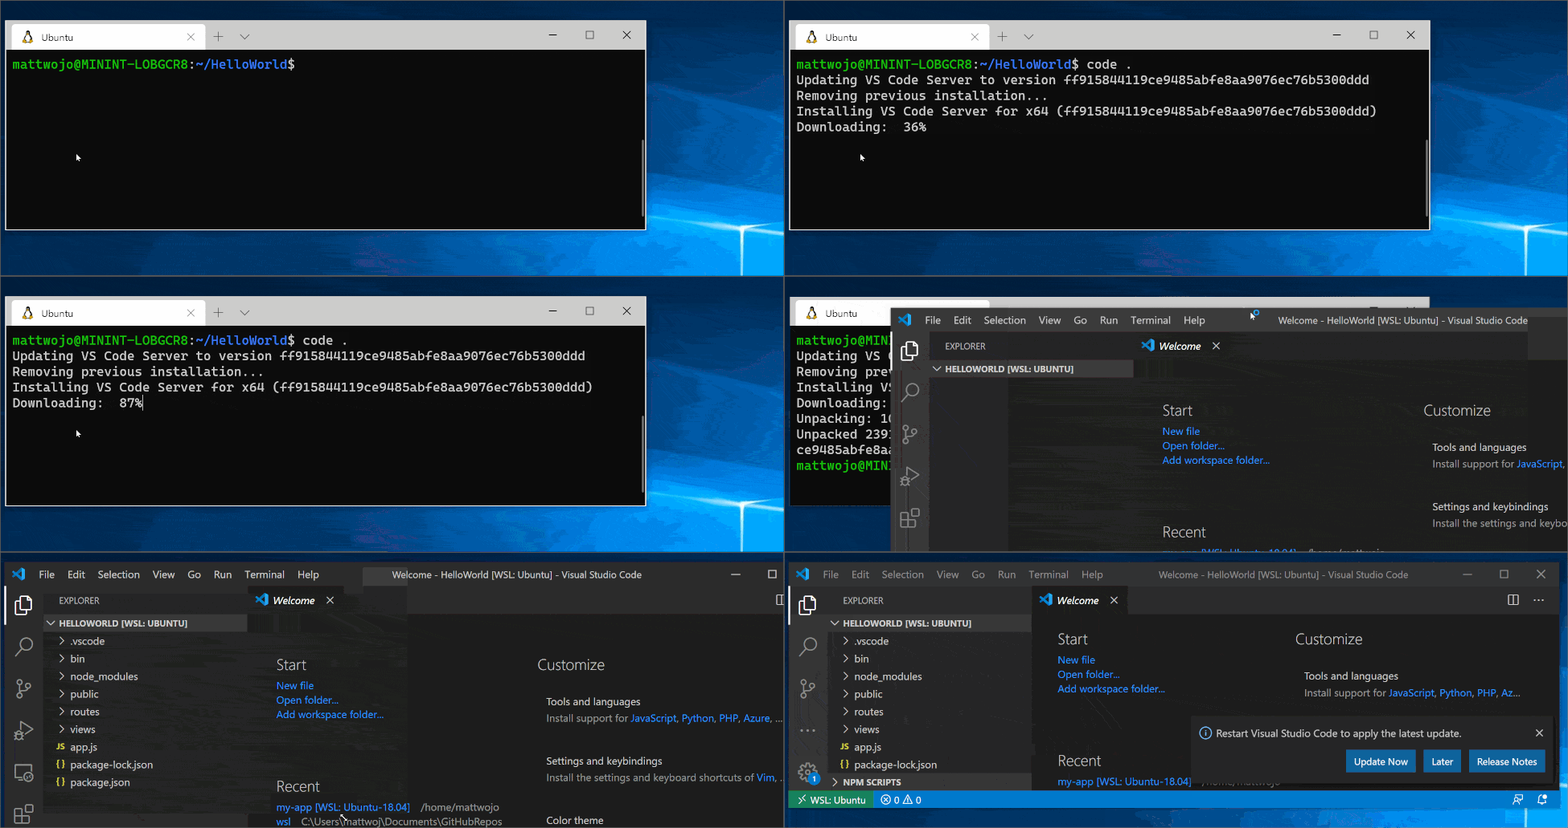
OR you can open VS Code and follow these instructions: > You can also access more VS Code WSL options by using the shortcut CTRL+SHIFT+P in VS Code to bring up the command palette. If you then type WSL, you will see options for opening or reopening a folder in WSL.
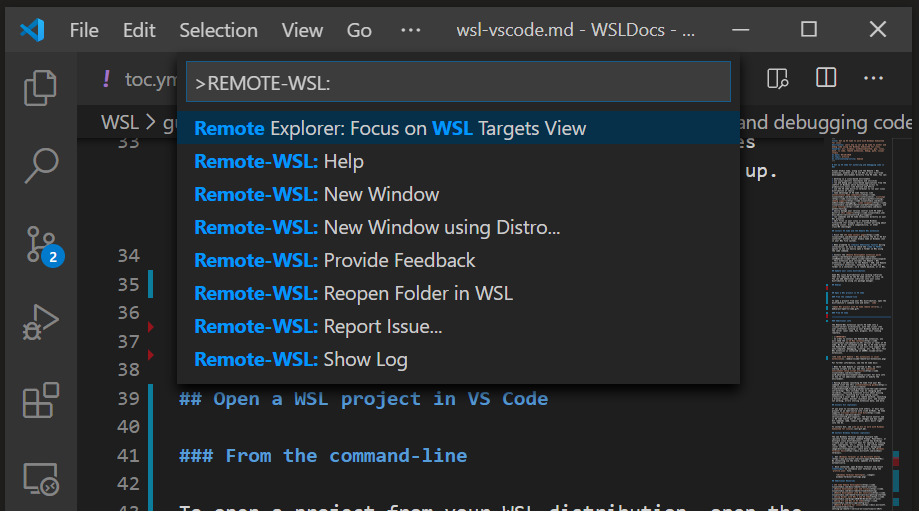
Break In Case of Emergency (Google Colab or Anaconda)
If, after consulting with the instructor, you still cannot get Python installed, you can install Python via Anaconda or use Google Colab for this course.
Anaconda is a free and open-source distribution of the Python and R programming languages for scientific computing, that aims to simplify package management and deployment. You can read more about it here https://en.wikipedia.org/wiki/Anaconda_(Python_distribution). You can download Anaconda here https://www.anaconda.com/download. You should be able to use the link above to download Anaconda for Windows, Mac, and Linux.
Google Colab is a free cloud service that allows you to write and execute Python in your browser. You can read more about it here https://colab.research.google.com/notebooks/intro.ipynb. You will need a Google account to use Colab, but you can use your @illinois.edu email.
I would prefer that we only use these options in the most extreme circumstances, but wanted to share that it is available and an option.
Terminals and Oh-My-Zsh (Optional)
Currently in VS Code, when you open a Terminal, you’ll see somewhat gnarly looking text like this:
zoe@ZoeLeBlanc MINGW64 ~/Documents/GitHub/is310-culture-as-data-2026 (main)This is because VS Code is using the default terminal, whether for Mac or Windows.
We will discuss more in-depth what terminals are in our Command Line session, but for now, you should know that a terminal is a bit like an app for working with files, but instead of clicking on icons, you write commands. You can read more about terminals here https://en.wikipedia.org/wiki/Command-line_interface.
Installing a separate terminal is completely optional since VS Code has built-in functionality, but in case you would like to try it out, I recommend iTerm2 https://iterm2.com/ for Mac and Windows Terminal https://aka.ms/terminal for Windows. You should be able to use both these links to download the appropriate version for your operating system, but please let the instructor know if you are having problems.
Once you have installed your terminal, you can customize it to be a little more human readable through using Oh-My-Zsh https://ohmyz.sh/. This step is again optional, but I find having a nicer and more readable terminal is helpful for working with code.
Windows Installation
Zsh is a unix shell and should be already installed on your WSL system. If not though you can install with the following:
sudo apt install zshThen you install oh-my-zsh with the following:
sh -c "$(curl -fsSL https://raw.github.com/ohmyzsh/ohmyzsh/master/tools/install.sh)"You can find more in depth instructions here https://dev.to/contactsunny/installing-zsh-and-oh-my-zsh-on-windows-11-with-wsl2-1p5i
Mac Installation
Zsh is a unix shell and should be already installed on your Mac.
Install oh-my-zsh with the following:
sh -c "$(curl -fsSL https://raw.github.com/ohmyzsh/ohmyzsh/master/tools/install.sh)"You can find more in depth instructions here https://dev.to/hannahgooding/how-i-customise-my-terminal-with-oh-my-zsh-macos-427i
PowerShell Alternative
If you decided not to install WSL and are instead using PowerShell, rather than using oh-my-zsh which only works on unix/linux operating systems, you can instead install oh-my-posh, following these instructions https://ohmyposh.dev/docs/installation/windows. Again this step is optional but as you can see in the image below, these types of configurations do help make your terminal more human readable.
Git
What is Git?

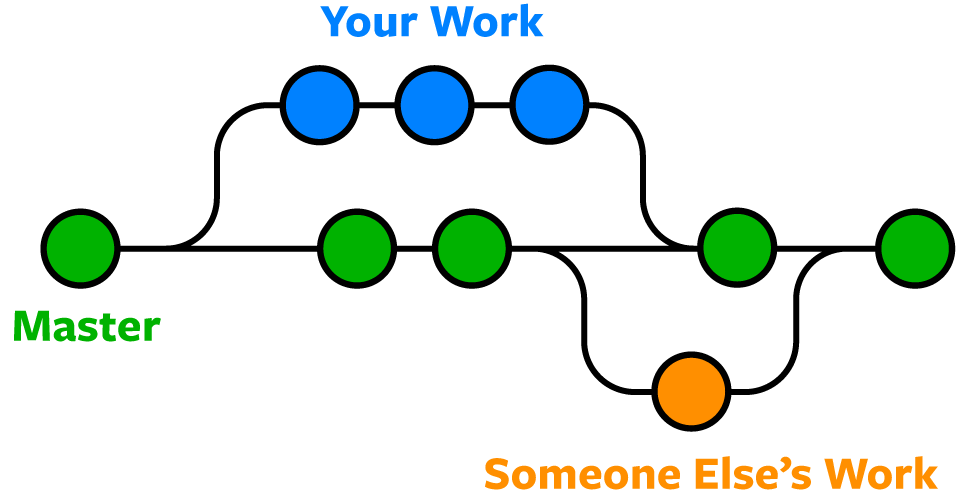
You can read more about Git here https://en.wikipedia.org/wiki/Git and here https://git-scm.com/about. Git is a version control system that allows you to track changes to files over time that was first created by Linus Torvals in 2005. It is a bit like Google Drive, but instead of just tracking changes to files, it also allows you to track changes to folders and directories. Somewhat confusingly, git is not the same as GitHub, though the two often are used together. We will be delving into these differences and how to use them later this week.
Mac Installation
Git should already be installed on your Mac, but you can check by opening up the VS Code terminal and typing:
git --versionIf you do not have git installed, this will prompt you to install it. You can also install it by following these instructions https://git-scm.com/book/en/v2/Getting-Started-Installing-Git.
Windows Installation
There are two common ways to use Git on Windows in this course. The instructions are different depending on whether you are using WSL/Ubuntu or PowerShell.
Option 1: WSL/Ubuntu
Use this option if you installed Windows Subsystem for Linux and plan to work in the Ubuntu terminal.
Open the VS Code terminal and make sure that WSL is selected as your terminal. You can do this by clicking on the Terminal menu option and then selecting Select Default Profile. You should see a list of options, and you should select Ubuntu or Ubuntu-20.04 (or whatever version of Ubuntu you have installed).
Now you first need to update the package list with the following command:
sudo apt updateThen you can install git with the following command:
sudo apt install gitYou can check that git is installed by typing:
git --versionOption 2: PowerShell
Use this option if you are working directly in Windows PowerShell rather than WSL/Ubuntu.
First, check whether Git is already available by opening PowerShell and typing:
git --versionIf PowerShell does not recognize git, install Git for Windows from https://git-scm.com/install/windows. During installation, the default options are fine for this course. The important part is that Git should be available from PowerShell after installation.
After installing, close and reopen PowerShell or VS Code. Then check again:
git --versionThe command sudo apt install git only works in WSL/Ubuntu. It will not work in PowerShell. If you are using PowerShell, install Git for Windows instead.
Git Configuration
Once you have git installed, you will need to configure it. You can do this by opening up the VS Code terminal and typing:
git config --global user.name "Your Name"
git config --global user.email "your.email@example.com"
These Git configuration commands work the same in macOS/Linux/WSL and PowerShell.
Replace “Your Name” with your exact GitHub Username handle. So for example, in my case it would be git config --global user.name "ZoeLeBlanc". Not “Zoe LeBlanc” or “Zoe LeBlanc (she/her)” or any other variation. It must be your exact GitHub username.
Replace “your.email@example.com” with the email address you used to sign up for GitHub. So in my case it would be git config --global user.email "zleblanc@illinois.edu".
Be sure to get both of these exactly right, as they are used to connect your GitHub account and git activity.
You can also check your git configuration by typing:
git config --listThis command also works in PowerShell.
CONGRATS YOU’VE SETUP YOUR COMPUTER 🎉
Footnotes
For more about this acquistion see Warren, Tom. “Microsoft Confirms It Will Acquire GitHub for $7.5 Billion.” The Verge, June 4, 2018. https://www.theverge.com/2018/6/4/17422788/microsoft-github-acquisition-official-deal.↩︎
Dohmke, Thomas. “100 Million Developers and Counting.” The GitHub Blog (blog), January 25, 2023. https://github.blog/2023-01-25-100-million-developers-and-counting/.↩︎
David., “Seeds Or Code?,” accessed April 5, 2023, https://blog.dshr.org/2019/11/seeds-or-code.html.↩︎
For more information on this topic, you can read “The Schism at the Heart of the Open-Source Movement” and Dear GitHub.↩︎